Imagine your home as a sanctuary, a place where the air you breathe is as pristine as a mountain breeze. Your air purifier works tirelessly to maintain this, silently battling invisible pollutants. But what if the very “eyes” of your air purifier – its sensors – become clouded with dust and grime? Just like a camera lens, a dirty sensor can lead to blurry, inaccurate readings, causing your device to underperform or even give you a false sense of security.
Maintaining clean air purifier sensors is paramount for ensuring your unit operates effectively and continues to provide you with the clean air you deserve. This comprehensive guide will walk you through everything you need to know about safely cleaning your air purifier’s sensors, empowering you to perform this crucial DIY maintenance with confidence. We’ll cover why sensor cleanliness matters, the right tools to use, and a detailed, step-by-step process to keep your air purifier working at its peak.
Understanding Your Air Purifier’s Sensors
Air purifiers are equipped with sophisticated sensors that act as their environmental eyes and nose, constantly monitoring your indoor air quality. These sensors are crucial for the device’s automatic modes, allowing it to adjust fan speed and filtration intensity based on real-time pollution levels.
What are Air Quality Sensors?
Most modern air purifiers feature a combination of sensors:
- Particle Sensors (Dust/PM2.5): These optical sensors detect airborne particulate matter like dust, pollen, pet dander, and smoke. They often use a laser to count and size particles, relaying this data to your purifier’s display and control system.
- VOC/Odor Sensors: Volatile Organic Compound (VOC) sensors detect gaseous pollutants such as chemicals from cleaning products, paints, cooking fumes, and even body odors. These are crucial for addressing indoor air pollution beyond solid particles.
|
Our Picks for the Best Air purifier in 2026
As an Amazon Associate I earn from qualifying purchases.
|
||
| Num | Product | Action |
|---|---|---|
| 1 | LEVOIT Air Purifiers for Home Large Room Up to 1875 Ft² with Washable Pre-Filter, AHAM VERIFIDE, Air Quality Monitor, HEPA Sleep Mode for Allergies, Pet Hair in Bedroom, Vital 200S-P, White |

|
| 2 | Air Purifiers for Home Large Room Cover Up to 1500 Ft² with True HEPA Filter, 20dB Sleep Mode, 360° Air Intake & Outlet, Air Cleaner for Bedroom Pets, 7 Color Light, HAP604, Bright White |
|
| 3 | Air Purifiers for Home with High Efficiency Filter Up to 1076 Ft² for Pet Hair, Odors, Pollen, Smoke, Compact Air Cleaner with 3 Speeds, Timer, Aroma Quiet 360°Intake Filter, White |
|
| 4 | Air Purifiers for Home Large Room, Cover Up to 2400 Ft² with True HEPA Filter, Smart Mode, PM2.5 Air Quality Display, 22dB Sleep Mode, Aromatherapy with 2X-Purification & 360°Air Outlet, HAP603 |
|
| 5 | KNKA Air Purifier for Home Bedroom Large Room Up to 1,695 Ft² in 1 Hr, HEPA Air Cleaner with Washable Pre-Filter, AHAM VERIFIDE, AQI Display, ECO Mode, Pet Mode for Pets, Dust, Pollen, APH4000 |
|
| 6 | LEVOIT Air Purifiers for Bedroom Home Dorm, AHAM VERIFIED, 3-in-1 Filter Cleaner With Aroma Pad, Filters Smoke, Allergens, Pet Dander, Odor, Dust, Office, Desktop, Core Mini-P, White |
|
| 7 | LEVOIT Air Purifier for Home Large Room Up to 1073Ft² with Air Quality Monitor, AHAM VERIFIDE, Smart WiFi, Washable Pre-Filter, HEPA Sleep Mode for Pets, Allergies, Dust, Pollen, Vital 100S-P, White |
|
| 8 | LEVOIT Air Purifier for Home Allergies Pet Hair in Bedroom, Covers Up to 1073 ft² by 56W High Torque Motor, AHAM VERIFIDE, 3-in-1 Filter with HEPA Sleep Mode, Remove Dust Smoke Odor, Core300-P, White |
|
| 9 | LEVOIT Air Purifier for Home Bedroom Dorm Room, Smart & Voice Control, AHAM VERIFIED, 3-in-1 Filter With HEPA Sleep Mode, for Pollen, Pollutants, Smoke, Dander, Dust, Core 200S-P, White |
|
| 10 | FreAire Air Purifiers for Bedroom Up to 1086 Ft², Air Purifiers for Home with Lights, HEPA Air Purifier Removes Dust Smoke Pollen Dander Smell, for Home/Pets/Bedroom |
|
Why Sensor Cleanliness Matters
Over time, dust, lint, and other airborne particles can accumulate on and around these delicate sensors. This buildup can obstruct the sensor’s ability to accurately detect pollutants. When sensors are dirty, your air purifier might:
- Give consistently low air quality readings, even when the air is poor.
- Show high readings, leading to unnecessary high-speed operation and increased energy consumption.
- Fail to automatically adjust fan speed, running inefficiently or not responding to changes in air quality.
- Shorten the lifespan of your filters by running excessively when not needed.
Signs Your Sensors Need Cleaning
How do you know it’s time for a sensor cleaning? Look out for these tell-tale signs:
- Inconsistent or Frozen Readings: Your air quality display seems stuck on one color or number, or doesn’t fluctuate despite obvious changes in air quality (e.g., cooking smells, dusting).
- Unresponsive Auto Mode: The purifier’s fan speed doesn’t change when there’s a clear increase in pollutants.
- Error Indicators: Some models may display a specific error code or light indicating a sensor issue.
- Frequent Filter Replacements: If your filters seem to wear out faster than expected, it might be due to sensors misreading and overworking the unit.
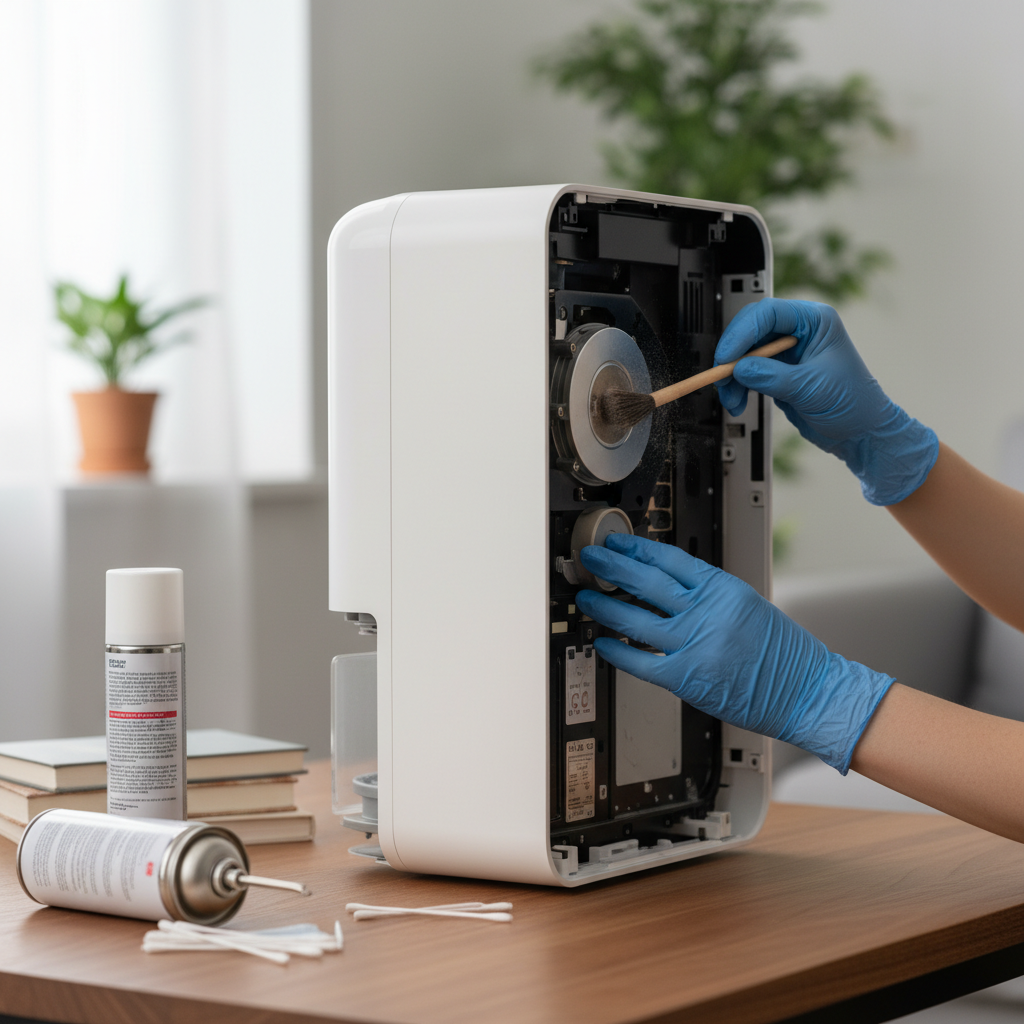
Essential Tools for Safe Sensor Cleaning
Before you begin, gather the right tools. Using the correct equipment ensures you clean the sensors effectively without causing damage to these sensitive components.
Recommended Tools:
- Soft-Bristle Vacuum Attachment: Ideal for gently suctioning dust from the sensor cover and surrounding vents without direct contact.
- Clean, Dry Cotton Swabs (Q-tips): Perfect for carefully wiping internal sensor components.
- Slightly Damp Cotton Swabs (Water Only): For some optical lenses, a very slightly damp swab with distilled water can be effective, followed immediately by a dry one. Always check your purifier’s manual first.
- Soft Microfiber Cloth: Useful for wiping down the exterior of the sensor cover and the unit itself.
- Your Air Purifier’s User Manual: This is your most important tool, as sensor locations and specific cleaning instructions can vary by model.
What to Avoid:
- Harsh Chemicals or Cleaning Solutions: Never use alcohol, ammonia-based cleaners, solvents, or abrasive sprays. These can damage delicate sensor components and leave residues.
- Abrasive Materials: Scouring pads, rough cloths, or paper towels can scratch optical lenses and sensor surfaces.
- Sharp Objects: Avoid using knives, screwdrivers, or any pointed tools to poke or scrape sensors, as this will almost certainly cause irreversible damage.
- Excessive Moisture: While a slightly damp swab might be acceptable for some optical lenses, never spray water directly into the sensor module or use soaking wet cloths. Moisture can short-circuit electronic components.
- Compressed Air Sprays: While often used for electronics, the forceful blast of compressed air can sometimes dislodge or damage delicate sensor parts, or even introduce moisture or propellants. Stick to gentle suction or wiping.
Step-by-Step DIY Guide to Cleaning Air Purifier Sensors
Cleaning your air purifier’s sensors is a straightforward process, but it requires patience and a gentle touch. Follow these steps carefully to ensure a safe and effective cleaning.
Preparation: Safety First
Safety should always be your top priority when performing any maintenance on electrical appliances.
- Power Off and Unplug: Completely turn off your air purifier and, critically, unplug it from the wall outlet. This prevents accidental activation and eliminates any electrical hazard.
- Consult Your Manual: Take a moment to review your air purifier’s user manual. It will provide specific instructions on locating the sensor, how to open its cover, and any model-specific cleaning recommendations or warnings.
Locating the Sensor Module
The air quality sensor is typically found on the back or side of your air purifier.
- Look for a small vent or a removable cover, often labeled “Air Quality Sensor” or simply “Sensor.”
- Some models might have a small hinged door, while others require a gentle pinch or slide to release the cover.
Gentle Exterior Cleaning
Once you’ve located the sensor area:
- Remove the Cover: Carefully remove the sensor cover as directed by your manual. Set it aside.
- Vacuum External Dust: Using a vacuum cleaner with a soft brush attachment, gently suction away any visible dust or debris from the exterior of the sensor cover and the immediate area around the sensor opening on the unit. Be careful not to make direct contact with the internal sensor components at this stage.
Delicate Interior Sensor Cleaning
Now for the most important part – cleaning the sensor itself.
- Use a Dry Cotton Swab: Take a clean, dry cotton swab. Gently insert it into the sensor chamber and very carefully wipe the surfaces of the sensor. You might see a small lens or a sensitive module. The goal is to remove any accumulated dust without applying excessive pressure or rubbing vigorously.
- Consider a Damp Swab (If Manual Allows): If your manual specifically mentions it, and for optical lenses only, you may very lightly moisten one end of a cotton swab with distilled water. Gently wipe the lens, then immediately use the dry end of another swab to dry the surface completely. Ensure no moisture remains. This step is usually only for optical dust sensors.
- Repeat as Needed: Use a fresh cotton swab if the previous one becomes visibly dirty. Continue until the sensor appears clean.
Reassembly and Post-Cleaning Check
With the sensor sparkling clean, it’s time to put everything back together.
- Reattach the Cover: Carefully reattach the sensor cover, ensuring it clicks securely into place if designed to do so.
- Plug In and Power On: Plug your air purifier back into the wall outlet and power it on.
- Observe Readings: Monitor your air quality display for a few minutes. You should notice more accurate and responsive readings, especially if the sensor was heavily soiled before.
- Reset Indicator (If Applicable): Some air purifiers have a sensor maintenance alert or an air quality indicator that needs to be manually reset after cleaning. Your user manual will provide instructions, often involving pressing a combination of buttons for a few seconds.
Advanced Tips for Maintaining Sensor Performance
Regular maintenance extends the life and efficiency of your air purifier.
How Often to Clean
Generally, it’s a good practice to clean your air purifier sensors every 1 to 2 months, or more frequently if:
- You live in a particularly dusty environment.
- You have pets that shed a lot.
- You use your air purifier in a kitchen where cooking fumes are common.
- You notice any of the “signs your sensors need cleaning” mentioned earlier.
Environmental Factors Affecting Sensor Dirt
Minimize sensor contamination by being mindful of your environment:
- Placement: Avoid placing the air purifier directly next to dusty areas, open windows, or in high-traffic zones where dust is easily stirred up.
- Pet Dander: If you have pets, ensure regular vacuuming and grooming to reduce airborne pet dander.
- Cooking: If using an air purifier in the kitchen, clean its sensors more frequently due to grease and smoke particles.
When to Consider Professional Help or Replacement
While DIY cleaning is effective for most issues, there are times when professional intervention or a sensor replacement might be necessary.
- Persistent Inaccuracy: If, after thorough cleaning and troubleshooting, your air purifier still displays inaccurate readings or fails to respond, the sensor itself might be faulty.
- Error Codes: Some complex error codes could indicate an internal hardware issue beyond simple cleaning.
- Physical Damage: If the sensor module appears physically damaged, it’s best to contact the manufacturer’s support.
“Regular maintenance of your air purifier, especially the sensors, is not just about extending its lifespan; it’s about ensuring it consistently delivers the healthy indoor air quality you invested in. Don’t underestimate the power of a clean sensor!” – Reviewlized Team, Air Purifier Technical Experts
Troubleshooting Common Sensor Issues After Cleaning
Even after a good cleaning, you might encounter some minor issues. Here’s how to address them:
Still Showing Incorrect Readings?
- Re-check for Debris: Double-check that all visible dust and lint have been removed from the sensor and its housing. Sometimes a tiny speck can still interfere.
- Allow Time: After plugging it back in, give the air purifier 10-15 minutes to recalibrate and stabilize its readings.
- Environmental Check: Ensure there isn’t a new source of pollution nearby that’s genuinely impacting the readings.
Sensor Error Lights
- Consult Manual: Refer to your manual for specific error code meanings. It might indicate a persistent blockage or a component malfunction.
- Power Cycle: Sometimes, a full power cycle (unplug for 30 seconds, then plug back in) can clear temporary glitches.
Resetting the Sensor
Many air purifiers require a manual reset after cleaning or filter replacement to clear maintenance indicators. Look for instructions in your manual; common methods include:
- Pressing and holding a “Reset” or “Filter Life” button.
- Pressing a combination of buttons (e.g., “Mode” and “Timer”) for a few seconds.
If these steps don’t resolve the issue, contact the manufacturer’s customer support for further assistance.
By taking a proactive approach to cleaning your air purifier sensors, you’re not just performing a chore; you’re safeguarding your investment and ensuring your home remains a haven of clean, fresh air. This simple DIY task can dramatically improve your air purifier’s efficiency and responsiveness, giving you peace of mind and better indoor air quality for years to come. So, when was the last time you checked your air purifier’s eyes?
Frequently Asked Questions
How often should I clean my air purifier sensors?
It is generally recommended to clean your air purifier sensors every 1 to 2 months, or more frequently if you live in a dusty environment, have pets, or notice inconsistent air quality readings. Regular cleaning ensures accurate monitoring and optimal performance of your device.
Can I use alcohol to clean air purifier sensors?
No, it is strongly advised not to use alcohol or any harsh chemical cleaning solutions on air purifier sensors. These substances can damage the delicate electronic components and optical lenses, leading to permanent malfunction. Always stick to dry cotton swabs or, if specified by the manual, a very lightly damp cotton swab with distilled water, followed by immediate drying.
What if my sensor is still not working after cleaning?
If your air purifier’s sensor continues to show inaccurate readings or malfunctions after a thorough cleaning, first try a full power cycle and re-consult your user manual for specific troubleshooting or reset instructions. If the problem persists, it may indicate a faulty sensor requiring professional repair or replacement, and you should contact the manufacturer’s customer support.
Where is the air quality sensor located on my air purifier?
The air quality sensor is typically located on the back or side panel of your air purifier. It often appears as a small vent or a removable cover, sometimes labeled “Air Quality Sensor.” Always refer to your specific air purifier’s user manual for the exact location and instructions on how to access it.