Every photographer, from the budding enthusiast to the seasoned professional, shares a common desire: to capture moments with pristine clarity and breathtaking detail. Yet, an insidious, often invisible enemy lurks within our cameras, threatening to mar even the most perfectly composed shot: sensor dust. While experienced photographers might be accustomed to the nuances of manual cleaning, those who rely on their camera’s intuitive auto mode often find themselves puzzled by unexpected spots and blemishes, unaware that a dirty sensor is the culprit. Understanding why sensor cleaning is paramount, especially when trusting your camera’s automatic settings, is key to unlocking truly flawless photography.
Understanding Your Camera’s Sensor and Its Vulnerabilities
At the heart of every digital camera lies the image sensor, a sophisticated electronic component responsible for converting light into digital data, forming your photographs. Positioned behind the lens mount, this delicate surface is incredibly vulnerable to environmental contaminants. Each time you change a lens, zoom a physically extending lens, or even during the normal operation of internal mechanisms like the shutter and mirror (in DSLRs), airborne dust, pollen, and microscopic fibers can find their way into the camera body. The sensor itself can even become statically charged, acting like a magnet for these unwelcome particles, trapping them on its surface or, more accurately, on the protective filter that sits just in front of it. A clean sensor isn’t merely a preference; it’s the fundamental canvas upon which all your images are painted, directly impacting the integrity and quality of every single photograph you take.
The Hidden Impact of a Dirty Sensor on Your Photographs
The presence of dust, smudges, or other debris on your camera’s sensor can have profound and disheartening effects on your images, often without immediate detection. These imperfections are not just minor annoyances; they are direct assaults on the visual quality of your work.
Visual Imperfections: Dust Spots and Smudges
|
Our Picks for the Best Air purifier in 2026
As an Amazon Associate I earn from qualifying purchases.
|
||
| Num | Product | Action |
|---|---|---|
| 1 | LEVOIT Air Purifiers for Home Large Room Up to 1875 Ft² with Washable Pre-Filter, AHAM VERIFIDE, Air Quality Monitor, HEPA Sleep Mode for Allergies, Pet Hair in Bedroom, Vital 200S-P, White |

|
| 2 | Air Purifiers for Home Large Room Cover Up to 1500 Ft² with True HEPA Filter, 20dB Sleep Mode, 360° Air Intake & Outlet, Air Cleaner for Bedroom Pets, 7 Color Light, HAP604, Bright White |
|
| 3 | LEVOIT Air Purifiers for Bedroom Home Dorm, AHAM VERIFIED, 3-in-1 Filter Cleaner With Aroma Pad, Filters Smoke, Allergens, Pet Dander, Odor, Dust, Office, Desktop, Core Mini-P, White |
|
| 4 | Air Purifiers for Home Large Room, Cover Up to 2400 Ft² with True HEPA Filter, Smart Mode, PM2.5 Air Quality Display, 22dB Sleep Mode, Aromatherapy with 2X-Purification & 360°Air Outlet, HAP603 |
|
| 5 | Air Purifiers for Home with High Efficiency Filter Up to 1076 Ft² for Pet Hair, Odors, Pollen, Smoke, Compact Air Cleaner with 3 Speeds, Timer, Aroma Quiet 360°Intake Filter, White |
|
| 6 | LEVOIT Air Purifier for Home Allergies Pet Hair in Bedroom, Covers Up to 1073 ft² by 56W High Torque Motor, AHAM VERIFIDE, 3-in-1 Filter with HEPA Sleep Mode, Remove Dust Smoke Odor, Core300-P, White |
|
| 7 | FreAire Air Purifiers for Bedroom Up to 1086 Ft², Air Purifiers for Home with Lights, HEPA Air Purifier Removes Dust Smoke Pollen Dander Smell, for Home/Pets/Bedroom |
|
| 8 | KNKA Air Purifier for Home Bedroom Large Room Up to 1,695 Ft² in 1 Hr, HEPA Air Cleaner with Washable Pre-Filter, AHAM VERIFIDE, AQI Display, ECO Mode, Pet Mode for Pets, Dust, Pollen, APH4000 |
|
| 9 | LEVOIT Air Purifier for Home Bedroom Dorm Room, Smart & Voice Control, AHAM VERIFIED, 3-in-1 Filter With HEPA Sleep Mode, for Pollen, Pollutants, Smoke, Dander, Dust, Core 200S-P, White |
|
| 10 | LEVOIT Air Purifier for Home Large Room Up to 1073Ft² with Air Quality Monitor, AHAM VERIFIDE, Smart WiFi, Washable Pre-Filter, HEPA Sleep Mode for Pets, Allergies, Dust, Pollen, Vital 100S-P, White |
|
The most recognizable symptom of a dirty sensor is the appearance of dark spots or hazy smudges on your photographs. These “sensor spots” are essentially the out-of-focus shadows of dust particles or debris that block light from reaching the sensor. While they might be less noticeable at wider apertures (smaller f-numbers) where the depth of field is shallow, they become strikingly apparent and sharply defined when you use smaller apertures (larger f-numbers, such as f/8, f/11, or f/16) [cite: 2 (from first search output), 1, 2 (from third search output)]. This makes them particularly problematic for landscape, architecture, or product photography where a greater depth of field is often desired.
Degradation of Image Quality
Beyond just visible spots, a dirty sensor can subtly but significantly degrade overall image quality. It can lead to a reduction in sharpness and clarity, making your photographs appear less crisp and detailed than they should. In some severe cases, certain contaminants might even cause minor color shifts or unwanted reflections, especially when shooting directly into a light source [cite: 3 (from third search output)]. The cumulative effect of these imperfections over time can diminish the professional appeal of your entire photo collection.
The Post-Processing Nightmare
Discovering a multitude of dust spots after a significant photoshoot can turn the joy of creation into a tedious post-processing nightmare. Each spot often requires individual attention, demanding careful cloning or healing in editing software. This not only consumes valuable time that could be spent on creative enhancements but also highlights the limitations of post-processing. While minor spots can be removed, widespread or stubborn contamination can be incredibly challenging, if not impossible, to fully erase without affecting underlying image details [cite: 1 (from third search output)].
Why a Clean Sensor is Especially Critical for Auto Mode
While a dirty sensor affects image quality regardless of the shooting mode, its impact is particularly acute and frustrating for those primarily utilizing auto mode. The very essence of auto mode relies on the camera’s ability to interpret a scene and optimize settings for the best possible outcome.
Auto Mode’s Reliance on Optimal Conditions
When you select auto mode, your camera’s sophisticated algorithms make a multitude of decisions, from exposure and ISO to aperture and white balance, all with the goal of producing a technically sound image. These algorithms, however, operate under the fundamental assumption of an unobstructed light path to a clean sensor. They cannot compensate for sensor dust. The camera will still strive for perfect exposure and focus, but the resulting image will inherently carry the flaws introduced by debris, generating an image that is “correctly” exposed but visually impaired. This creates a disconnect between the camera’s intended output and the actual flawed result.
User Experience and Expectations in Auto Mode
Users who opt for auto mode often do so for its convenience, expecting reliable, high-quality results with minimal effort or technical intervention. They trust the camera to handle the complexities. When unsightly spots or smudges appear on their photos, they may initially blame the lens, poor lighting, or even their own technique, rather than identifying the less obvious culprit: a dirty sensor. This lack of awareness can lead to significant frustration, dissatisfaction with the camera’s performance, and a loss of confidence in their equipment. For many, the expectation of “point and shoot” perfection is shattered by an issue they didn’t anticipate.
Potential Impact on Autofocus (Mirrorless Cameras)
While a dirty imaging sensor doesn’t typically affect the autofocus system of traditional DSLRs (which use a separate AF sensor), modern mirrorless cameras increasingly use the main imaging sensor for autofocusing. While minor dust is unlikely to cripple AF, severely contaminated areas could theoretically interfere with the sensor’s ability to accurately detect contrast or phase, potentially leading to inconsistent focusing in those specific regions. However, the primary and most universal impact remains the degradation of the final image itself [cite: 1 (from second search output)].
Identifying a Dirty Sensor: Your Diagnostic Checklist
Before embarking on any cleaning endeavor, it’s crucial to confirm whether your sensor is indeed dirty and to pinpoint the location of any contaminants.
The “Blue Sky” Test
The most reliable and universally recommended method for checking your sensor for dust is the “blue sky” test.
- Set your camera to Aperture Priority (Av or A) mode.
- Select the smallest aperture possible, typically f/16 or f/22. This brings dust into sharper focus.
- Set your ISO to its lowest native setting (e.g., ISO 100 or 200) to minimize noise.
- Point your camera at a clear, bright, evenly lit surface. A cloudless blue sky, a white wall, or even a brightly illuminated computer screen works well.
- Take a photograph, slightly out of focus, or continuously pan the camera during the shot to avoid capturing sharp details that could distract from dust spots.
- Review the image at 100% magnification on your computer. Look for dark, circular, or irregularly shaped spots. These are your sensor dust particles.
Recognizing Other Symptoms
Beyond the blue sky test, other indicators can suggest a dirty sensor:
- Repeated Spots: If you notice the same spots appearing in the identical locations across multiple photographs, especially those taken with different lenses, it’s a strong sign of sensor dust.
- Hazy Areas or Reduced Contrast: While less common, larger smudges or oil residue can cause localized hazy areas or a subtle reduction in contrast in specific regions of your images.
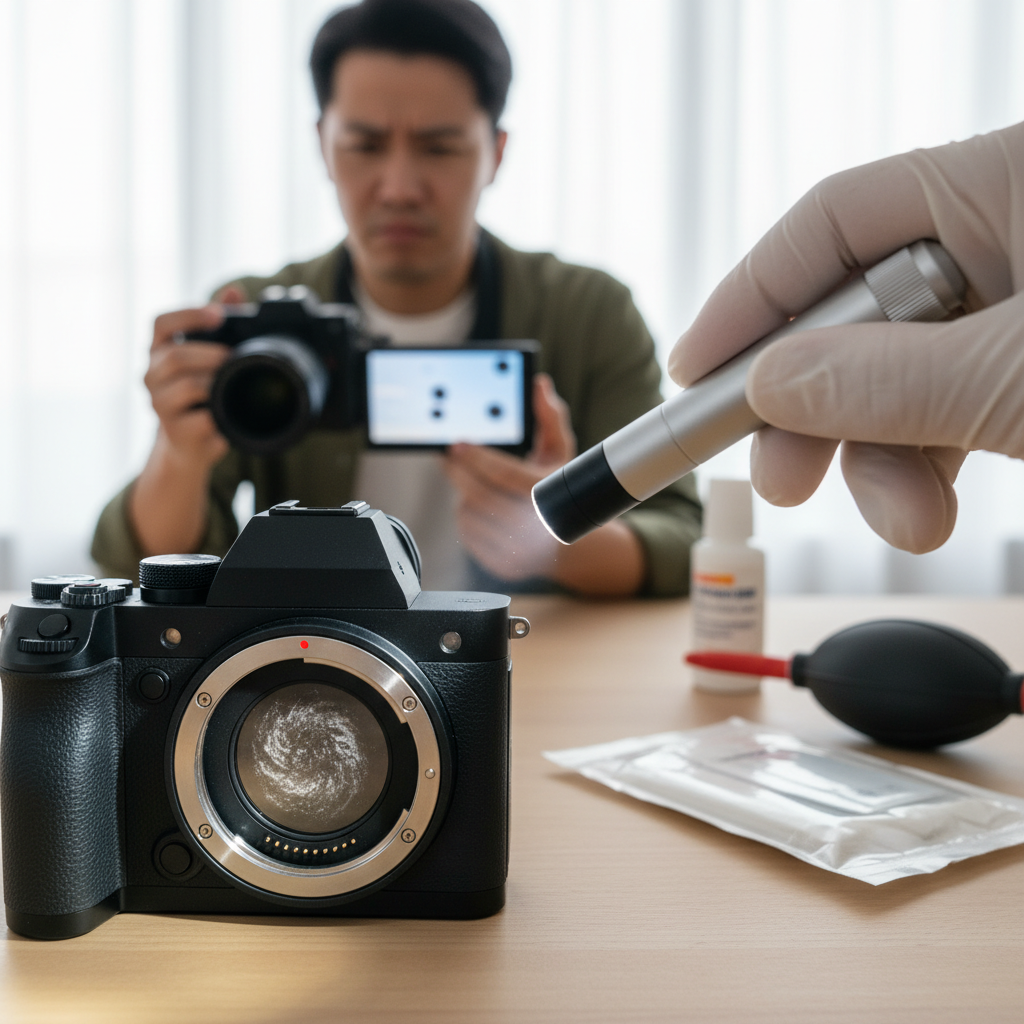
Sensor Cleaning Methods: DIY vs. Professional Approaches
Once you’ve confirmed the presence of sensor dust, the next step is to clean it. You have several options, ranging from in-camera features to professional services.
In-Camera Automatic Cleaning Systems
Many modern cameras incorporate automatic sensor cleaning systems. These typically work by vibrating the camera’s low-pass filter (the clear glass protecting the sensor) at ultrasonic frequencies, or by shifting the sensor itself [cite: 3 (from first search output)]. This mechanical action aims to dislodge loose dust particles, which then fall into a dust trap within the camera body. These systems are generally safe, have a negligible impact on battery life, and can be activated automatically at startup/shutdown or manually through the menu [cite: 4 (from first search output), 5 (from first search output)].
“While internal automatic cleaning systems are incredibly convenient for managing loose dust, they often fall short when dealing with more stubborn contaminants like pollen or oil smudges. Think of them as your camera’s first line of defense, not the ultimate solution.” – Dr. Elena Petrova, Imaging Science Researcher
However, their effectiveness is limited to loose, dry particles. They often cannot remove static-clung dust, oil, or more adhesive contaminants [cite: 4 (from first search output), 2 (from second search output)].
Basic Dry Cleaning (DIY)
For loose dust that auto-cleaning can’t handle, basic dry cleaning is the safest DIY option:
- Rocket Blower: A dedicated, rubber bulb air blower (not compressed air cans, which can spray propellant) is indispensable. With the camera facing downwards in sensor cleaning mode (mirror lock-up for DSLRs), give a few firm puffs of air into the sensor chamber. Always ensure the blower’s intake valve is filtered and opposite the nozzle to avoid introducing more dust [cite: 3 (from first search output)]. This is often effective for surface dust.
- Sensor Brushes: While some swear by specialized, statically charged brushes to lift dust, they require extreme caution. Any oil or debris on the brush can transfer to the sensor, creating bigger problems. Many experts recommend avoiding them altogether for beginners [cite: 5 (from second search output)].
Advanced Wet Cleaning (DIY)
When dry cleaning methods prove insufficient, particularly for stubborn spots, wet cleaning using specialized sensor swabs and cleaning solutions is the next step.
- Sensor Swabs and Solution: These kits contain individually packaged, lint-free swabs and a specially formulated, streak-free cleaning liquid. With the camera in sensor cleaning mode, carefully apply a drop or two of solution to a new swab and wipe the sensor gently in a single, overlapping pass, then repeat with the other side of the swab for the return pass.
- Warnings and Precautions: DIY wet cleaning carries inherent risks. Improper technique can lead to streaks, scratches, or even damage to the sensor’s delicate surface or its protective filter. Always work in a clean, dust-free environment, use fresh, high-quality supplies, and follow instructions meticulously. If you are not confident, it’s better to reconsider.
When to Seek Professional Sensor Cleaning
There are situations where professional intervention is the wisest choice:
- Stubborn Stains: For oil marks, pollen, or deeply adhered grime that DIY methods fail to remove.
- Lack of Confidence: If you’re uncomfortable performing a wet clean yourself, the peace of mind offered by a professional service is invaluable.
- Preventing Damage: Professionals have the expertise and specialized tools to clean your sensor thoroughly without causing damage, ensuring your camera remains in optimal condition [cite: 2 (from second search output), 3 (from first search output)].
Best Practices for Sensor Maintenance and Prevention
Proactive maintenance is always preferable to reactive cleaning. By adopting a few simple habits, you can significantly reduce the frequency of sensor dust issues.
Mindful Lens Changing Techniques
The moment your camera’s body is exposed is when dust is most likely to enter.
- Choose a Clean Environment: Avoid changing lenses in dusty, windy, or humid conditions.
- Point Downwards: When swapping lenses, hold the camera body facing downwards. Gravity helps prevent dust from falling directly onto the sensor.
- Be Quick and Efficient: Minimize the time the sensor is exposed to the air. Have your new lens ready to attach immediately.
- Avoid Zooming Before Removing: If your lens extends, avoid zooming out fully just before removing it, as this can draw air (and dust) into the camera.
Proper Storage and Handling
How you store and handle your camera plays a crucial role in preventing dust accumulation.
- Body and Lens Caps: Always keep body caps on when no lens is attached, and lens caps on both ends of your lenses when not in use.
- Protective Gear: Store your camera and lenses in a clean, well-padded camera bag when not in use.
- Humidity Control: In humid environments, consider using desiccant packets in your camera bag to prevent moisture-related issues, which can make dust adhere more stubbornly.
Regular Inspection Routine
Making a habit of regularly checking your sensor, even if you don’t suspect an issue, can help you catch minor dust problems before they escalate. Perform the “blue sky” test before important shoots or every few weeks, especially if you frequently change lenses.
Conclusion
A clean camera sensor is not merely an aesthetic preference; it is a fundamental requirement for capturing high-quality photographs, particularly when you rely on your camera’s auto mode. Dust and smudges can stealthily degrade image clarity, introduce unsightly spots, and transform post-processing into a tedious chore, directly undermining the convenience and quality expected from automatic settings. By understanding how dust infiltrates your camera, recognizing its impact, and implementing a regimen of mindful maintenance—from careful lens changes to judicious cleaning—you empower yourself to consistently produce pristine, professional-looking images. Don’t let an invisible adversary compromise your creative vision. What steps will you take today to ensure your camera’s sensor is ready to capture flawless moments?
Frequently Asked Questions
How often should I clean my camera sensor?
The frequency depends on your shooting habits and environment. If you frequently change lenses or shoot in dusty conditions, you’ll need to check and clean your sensor more often. A good practice is to perform a “blue sky” test before critical shoots or every few weeks to monitor for dust.
Can a dirty sensor damage my camera?
A dirty sensor itself won’t typically damage the camera’s internal components. However, improper cleaning techniques can cause scratches or damage to the sensor’s protective filter, which is a very costly repair. It’s the cleaning process, if done incorrectly, that poses the risk.
Does auto mode automatically clean the sensor?
No, “auto mode” for shooting settings (like Program Auto or Shutter/Aperture Priority) does not automatically clean the sensor. Many cameras have an automatic sensor cleaning function that uses vibration, which can be set to run on power-up/down or manually. This is separate from the exposure mode.
Is it safe to clean my sensor myself?
Basic dry cleaning with a rocket blower is generally safe for removing loose dust. Wet cleaning with specialized swabs and solutions can be done safely with proper technique, but it carries a higher risk of damage if done incorrectly. For stubborn stains or if you’re unsure, professional cleaning is the safest option.
What’s the difference between dust on the lens and dust on the sensor?
Dust on the lens (especially on the front element) rarely shows up in photos due to its distance from the focal plane, though severe smudges can reduce contrast. Dust on the sensor, however, is much closer to the image plane and appears as clearly defined spots or smudges in your actual photographs, especially at smaller apertures.